|
|
 "A revival of the famous BMW M1 Procar series".... That was the idea when this project was started more than a year ago. Not really an original theme in slotracing, 1/24 M1's are very popular in Germany where they have been racing them for years. But the approach, scale and purpose of what's about to start on the Amsterdam Carrera track is..... "A revival of the famous BMW M1 Procar series".... That was the idea when this project was started more than a year ago. Not really an original theme in slotracing, 1/24 M1's are very popular in Germany where they have been racing them for years. But the approach, scale and purpose of what's about to start on the Amsterdam Carrera track is.....
 The Men behind Procar.....the Initiator... The Men behind Procar.....the Initiator...
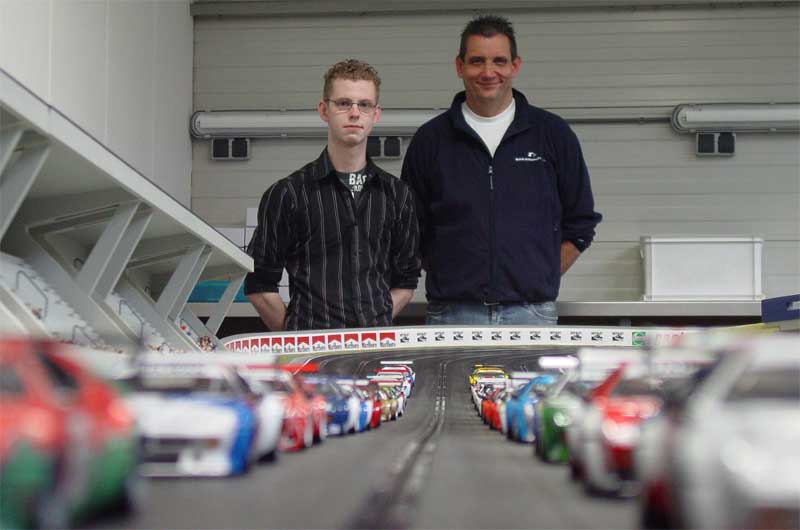
Leading man behind the Procar series is Ronald Zaal (pictured right) a former Touringcar team manager who, like so many guys active in 1/1 racing, loves racecars big and small....as long as they look as good as the real cars and drive as well.
For 3 years he's been busy constructing one of the most beautifull Carrera tracks in Europe, if not the world. During those late night hours he started thinking about how to have a race series were both novice and experienced slotracers could compete with each other.
They would need to have identical material, meaning identical cars, bodies, chassis...and a catching theme.
IROC some of you might say. True in this the US series Nascar, Indy and Cart drivers are invited to slugg it out in identically build Firebirds.
But as Ronald has more affection with Bavarians than Americans, a grid full of BMW M1's Procars fitted his plans perfectly.
Pitching his idea to both experienced and soon to be experienced (slot)racers all of the 20 original Procars were soon spoken for.
..now who could he turn to to build and prepare some 20 identical cars?
...and the Constructor.
Nick de Wachter' and his growing reputation as one of the top of the line modelcar racers and constructors needs no introduction, but even he had to acknowledge that building the M1's has been a gigantic project. One that at times looked like it would go on for ever, even with a helping hand from time to time.
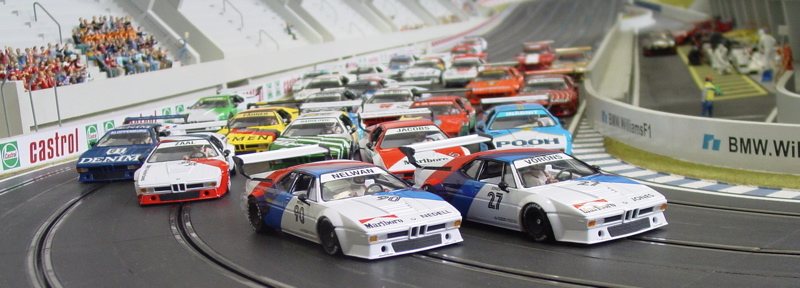
In total 25 cars have been build (all available Procars with some additional LM 's), all fully detailed and build to the same specs.
Each car has been tried and tested and is capable of running the same lap times (at least with Nick driving ;)
So as the Dutch say: Lang gewacht, nooit gedacht en toch......gekregen. It may have taken more than a year but Friday June 1st the Procars were presented to their expecting drivers....and they were not dissapointed ;)

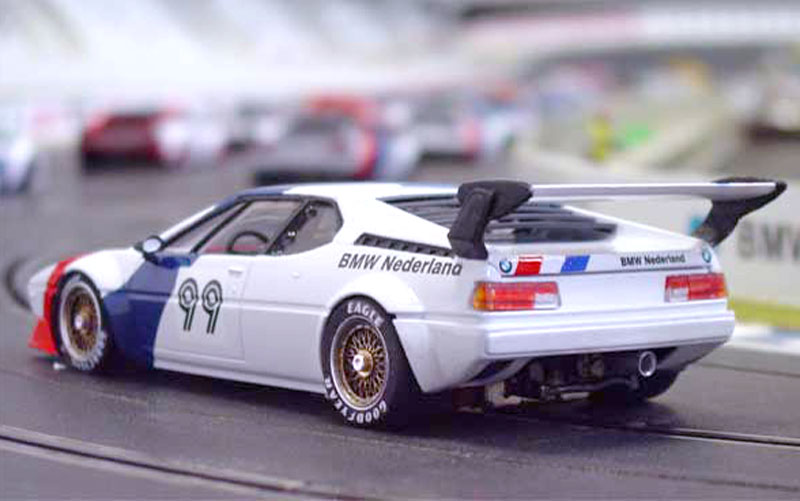
Procar BMW M1...made in Holland
Before accepting the challenge to build 25 equal cars Nick needed some time to think about, as he knew it would take a serious amount of time and even more effort to build not only good looking M1's, but ones that drove good as well, and all just as fast. The potential of Ronald's plan's was so obvious that it was easy to see the succes it would have once completed. So he accepted and started "the build" a good year ago, determend to make it his biggest and most ambitous project yet.
Nick explains some of the more interesting parts of the building process:

First step was making a list off all the materials that I would need and to see how many decalsheet were available of all those different spectacular colorschemes. I did a lot of research, getting good refernce pictures and learning al ther was to know about the M1. I also checked out the rules and regs of other (German) series running M1's. But I found that most of them were running too narrow with too skinny wheels. As I was going to have control over how all cars would be build I could use smaller tolerances because first of all I wanted to copy that dramatic and 'fat' look of a 1/1 BMW M1 on the track
That low stance with those big fat racing wheels filling every millimeter of those wide wheelarches. I also wanted the cars to have a realistic detailled cockpit and some motor detail as well.
Procar Productionline
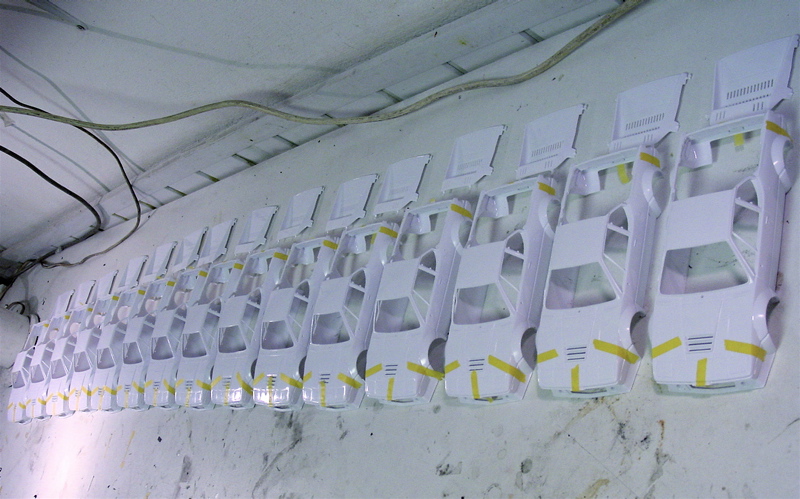 
The picture on the left was taken on March 3rd 2006, just after we got the Revell M1 kits delivered. Yeah, it was something else, having 25 cars on my desk, doing everything 25 times.
In order to keep the same working procedure and to avoid anomaly's during construction it was necessary to do it this way, as this was the best way to keep track of things. I started with just glueing the body's, and as some of you might know, they're not of the best quality.
It took me a week to sand and shape all the 25 cars in the way I wanted them to be. I also reinforced the body's in front of the front wheel-arches using sheetplastic. (see picture right)

Next up was painting them. Ronald got me all Michael Ortmann's M1 decals available, additioned by Studio 27 and some home grown decals. Once everybody chose their favorite livery I got on with it. First the inside of all bodies were completely masked off. This would preserve a clean "Boxstock" finish, which would also help me to check (once the series had started) if anyone had was sanding or grinding their bodies.
Working in batches of 3 cars, with most liveries having 2 or more colours, I managed to finish an average of 1 painted M1 per 1,5 day.
Procar Pain(t)
All cars were given a shot of Tamiya white primer and a basecoat of Motip white. Together with Ronald we looked hard for a white that would resemble that of a racing M1 under the sun, taking in account that most of the 1/24 cars would be spend their lives under artificial neon lights.
In the end it turned out that the best colour for the Beemers was......ahem....the white they use on Mercedes Vans.
For the secondary colors I used Tamiya spray cans, with non standard colors mixed from these cans an applied with an airbrush.
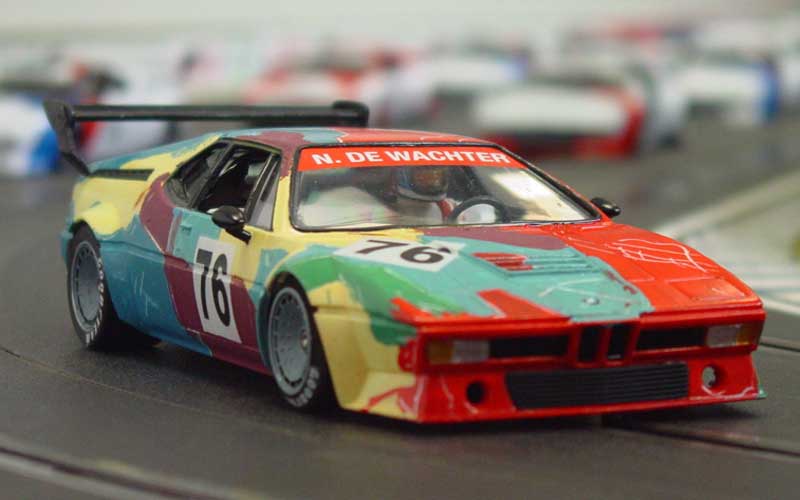 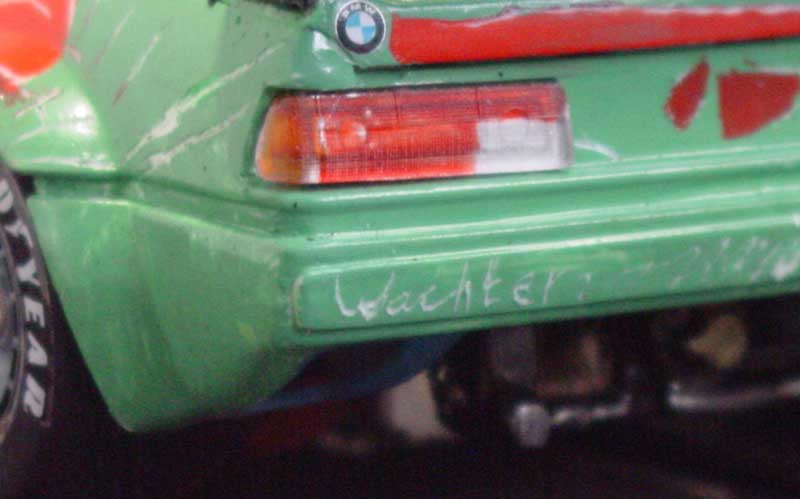
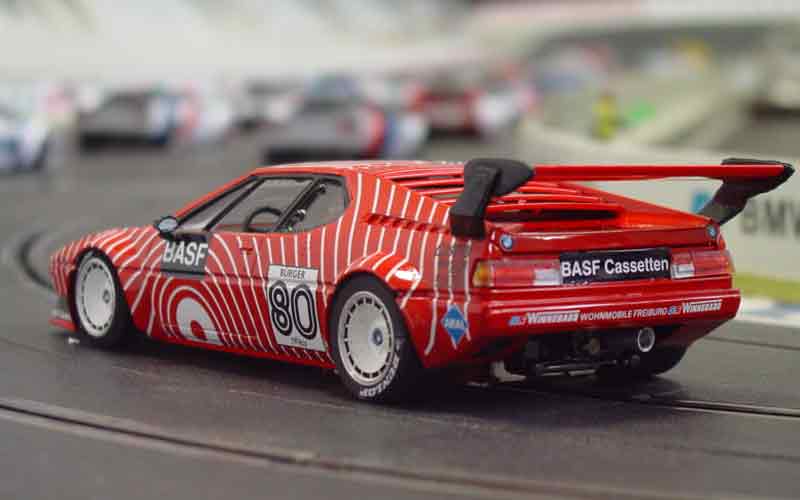
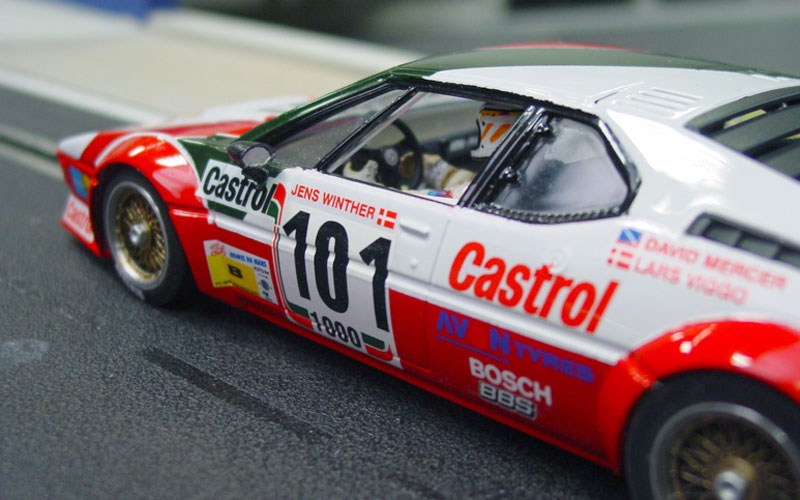
For myself I chose the Andy Warhol Art Car, copying it in what I think is the only way the make this livery: paint it by hand, just as Andy did. The scratches and signature are made with a broken 0,5mm drillbit, #76 is the only M1 that was not clear coated
After I'd done all the painting came the decalling. So were easy and pretty straight forward (works versions), some were a real nightmare (Pooh jeans), and some were such a nightmare that you woke up with a pain in the ##s (Basf). But still I managed to maintain an average of 2 body's a day.
After the decalling all cars were brought to a professional car painter who gave them 2 shots of automotive 2k clear. This was the only option as the different decals (DMC/Ortman/Studio27) all had their own ways of reacting to clear coats. Spraying was done with great care, the clearcoat needed to be thick enough to get an even shine and protection but not too thick as not to loose the body detail.
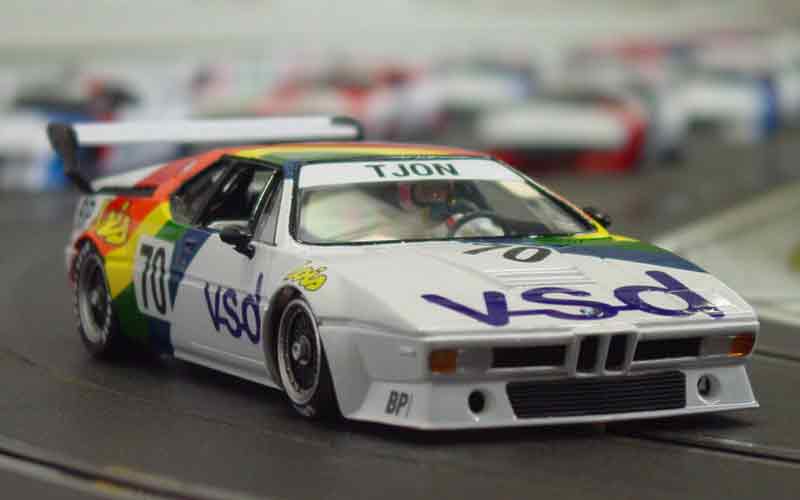 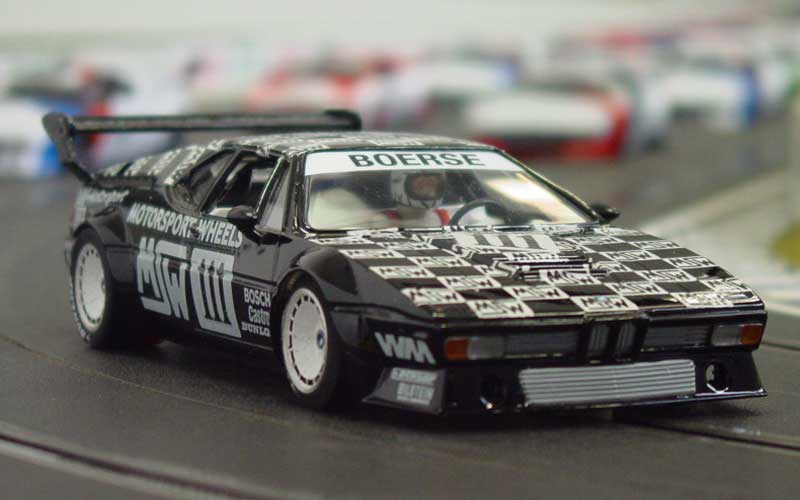
Copying the 1/1 cars, the windowstreamer tells the name of its driver, here the Sharon Tjon and Erwin Boerse cars, these two liveries were not available so they were draw by Tamar.
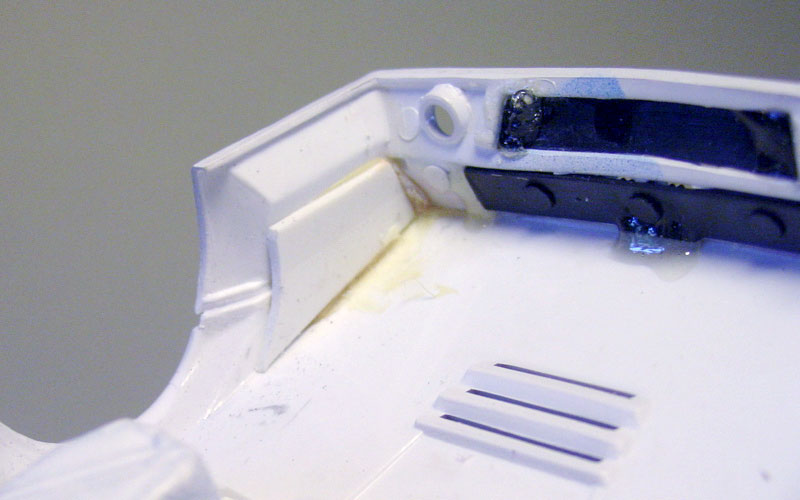
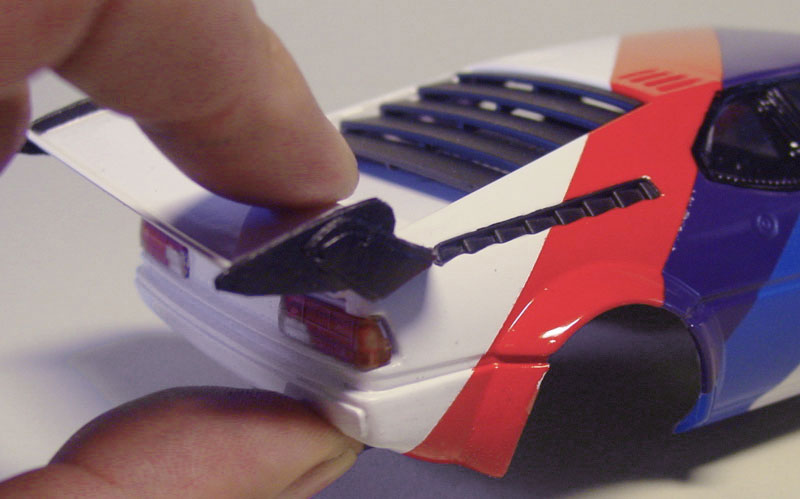
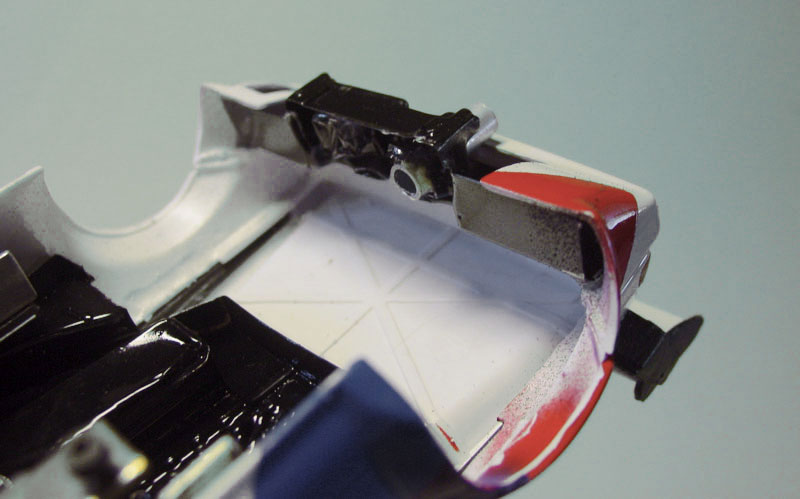
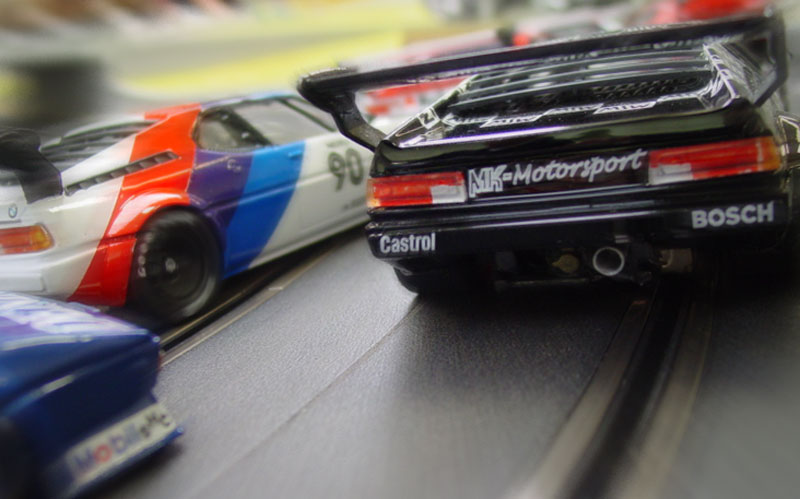
When the body's were dry and the clearcoat had hardener out, I glued in the detail bits and pieces (louvre, fenders) here I used 2k glue, to make sure they'll last long, but still had a bit of flexibility. Also during this period the wings were added to the cars.
As the M1's will be raced by racers of differing talents, the rigid thin wingmounts would be their achilles heel. Flexible rubber mounts were a must-have.
Initially these were ordered from Matthias Parke, but their surface was a bit rough, so in the end I made my own mould and used my self-poured rubber wingmounts.
Procar Hardware
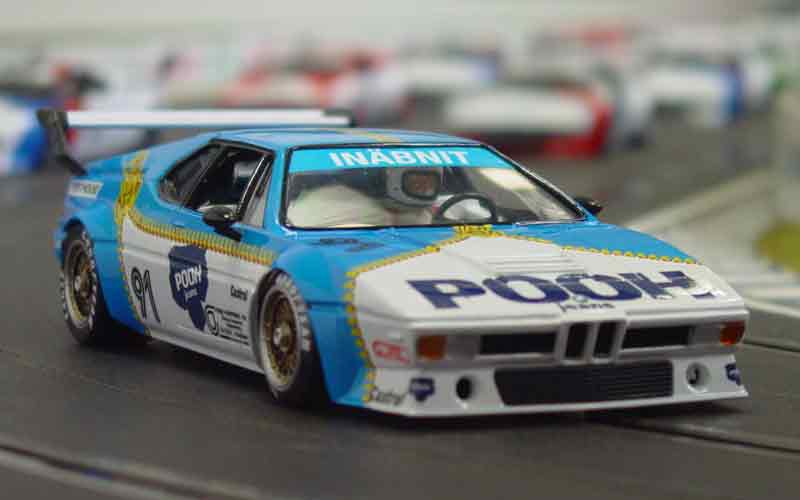
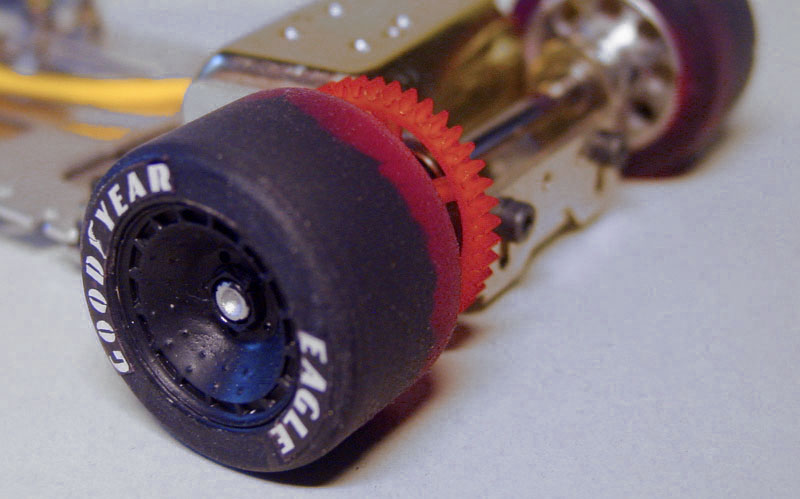
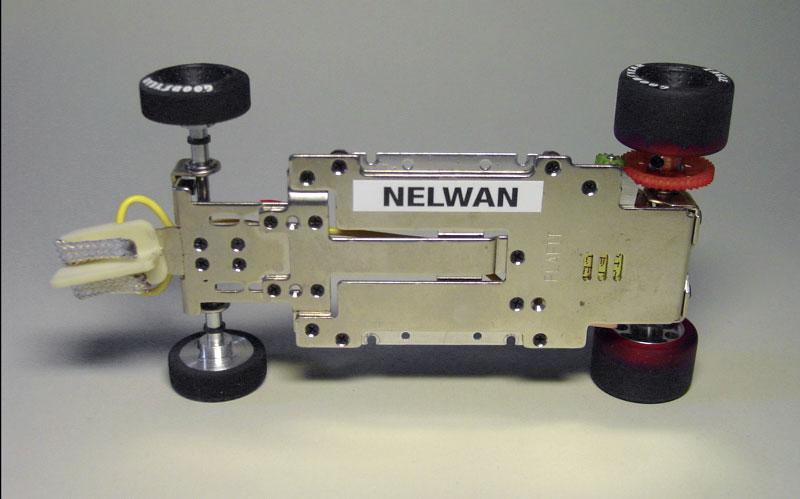
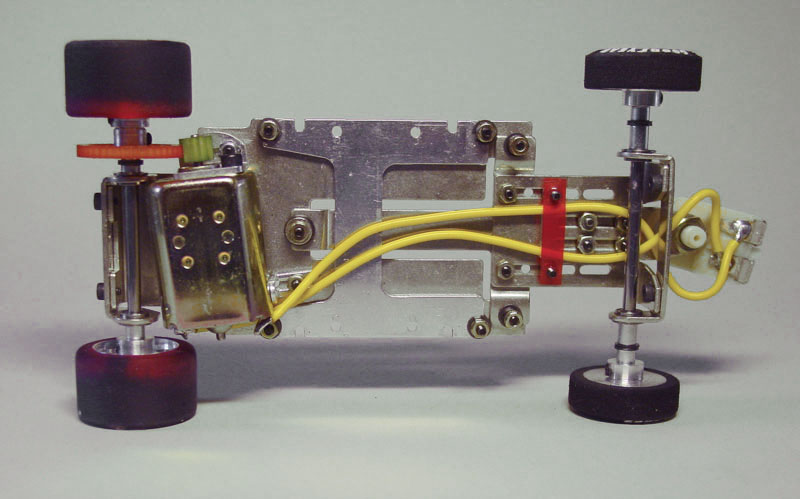
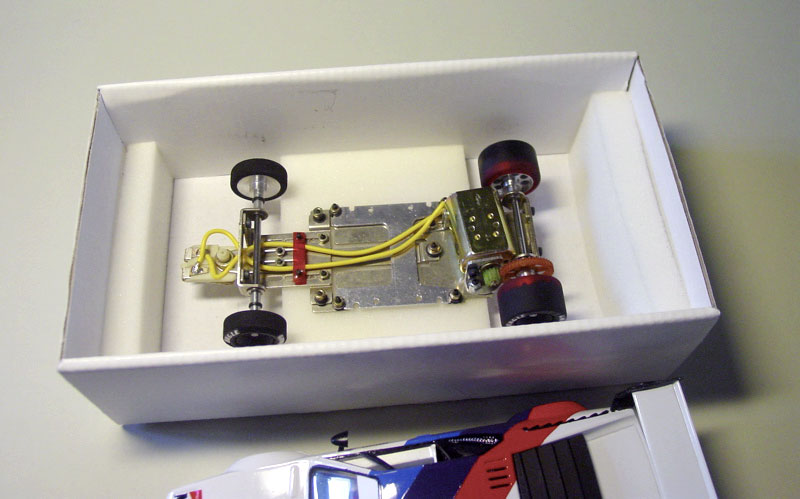
As the bodies took colour and shape I started on the chassis. I decided on a nice and simple set-up. For the Procar chassis's I used the Plafit Exel Springsteel because...their simple, strong, and I can assemble them blindfolded..well sort off. But knowing the ins and outs of this chassis meant that it was easy for me to "blueprint" them. All I've done on the chassis's is extra tightening all the nuts, putting a 0,5mm spacer above the subframe and puzzeling with the the chassis lay-out until I got an easy reproduceble set-up. Race-rubber came from Michael Ortmann,trued to 25,5 mm diameter these Polyutherane tyres were specially cast for the Procar series, their red-color band an easy identification tool.
Gear ratio's are of course the same, being 12/42. Running the M1's on 17 Volts with the Bison motor this gear ratio ensure's a fair amount of top speed, but relatively more acceleration and brake. Just like in the real races I wanted to empower the racers to defend their lines whenever under attack.
Body control
Next up: glueing the body's on the bodyholders. Now this was quite complicated for the following reasons:
- I wanted the cars to sound nice and smooth (hence the hard rubber front wheels without superglue to harden)
- I needed the connection to be in rubber, to provide as much grip as possible
- As the total body runs inwords at the bottom it's difficult to make a clean connection from the holders to the body
- I wanted that charactaristic look of the wheels 'fat' in the wheelarch, so I couldn't have so much free play as I'd normally have.
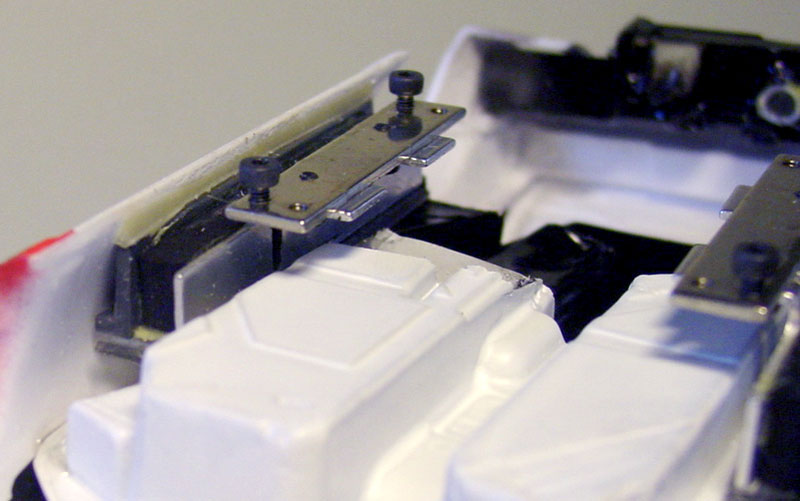
It caused some real headaches, but here's what I've done: Solving the body narrowness at the bottom I used a plastic L-profile and glued it in. Now I had a nice vertical plane to work with. Using the aluminium L-shaped bodyholders from Plafit and glueing on a piece of rubber was a piece of cake, but then, how was I gonna make sure the wheels wouldn't rub the wheelarches without mounting the body that high that it wouldn't look good anymore? Well, I glued a strip of 1,5mm thick lexan on top of the rubber, that rested on the aluminium holder, without being attached to it. This way the body could sway sidewards and to the front and rear during impacts, but not up and down anymore, enabling me to attain that realistic rideheight.
Finishing touches
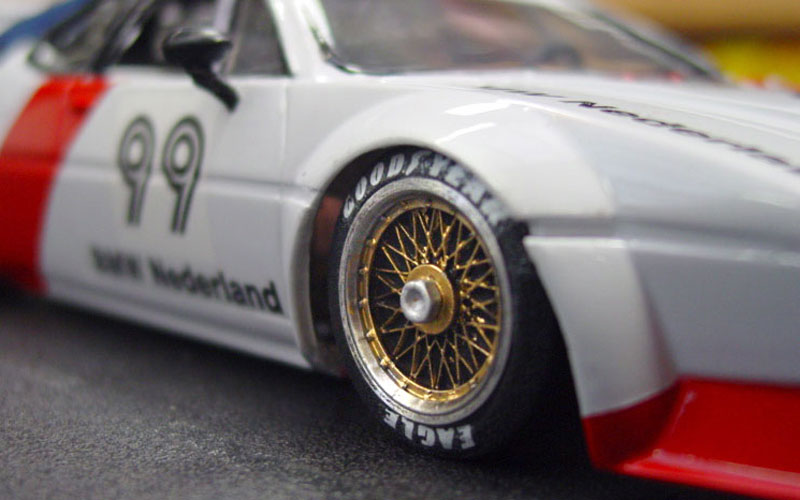 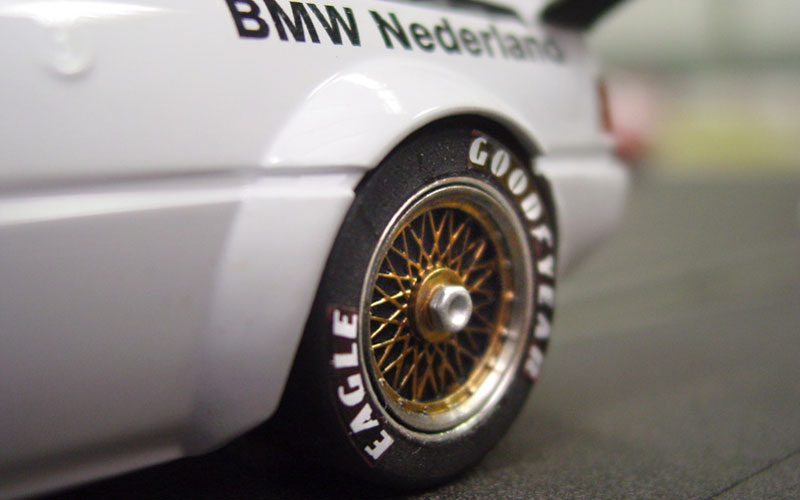
Now I had 25 semi-finished cars, but before I could continue, I just needed inserts to give me a motivation boost. So, knowing I had to provide each car with a spare set of wheels, I started pouring some 150 inserts... really!! I reproduced two different models, the old BBS and the ones whit the aerodynamic disc, both models 17mm in diameter. The BBS resin inserts were first painted gloss black and then "chromed" with Allcladd Polished aluminium, Gold was applied by brush to the centre sections. That lookes a lot better!
 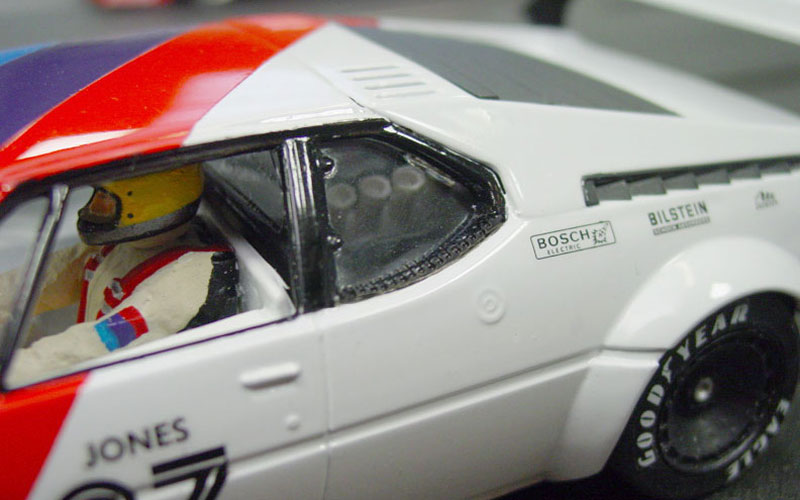
To finish the cars properly, we wanted the most realistic looking interior ever. So I built a custom made full length ànd full depth M1 cockpit including the engine bay with additional detail. Using the original Revell kit interior as a base meant it would fit my cars as a glove. I also made some suspension detail to go between the rear wheels, without forgetting a true scale exhaust pipe of ..... 5mm diameter.
I casted several copies of my 'master' and brought them to a company that I came in contact with some months ago which specialises in vacu-forming.
 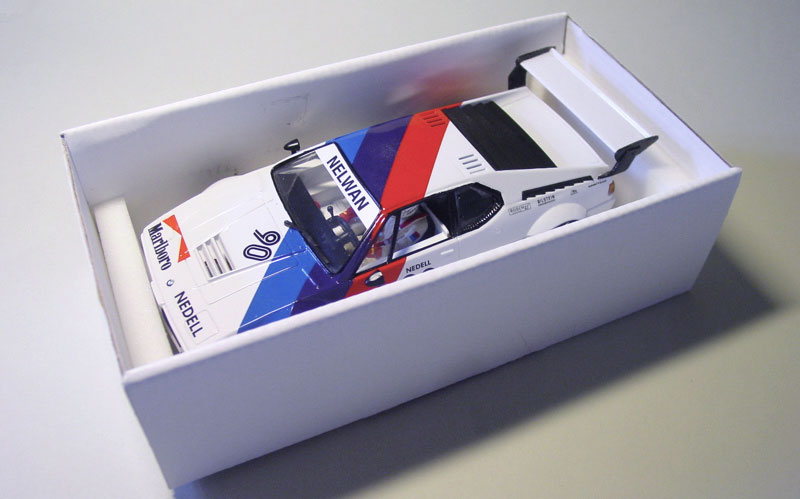
Making a totally finished product I made these boxes for the cars so that they coud be transported safely by their owners. Foam padding ensures that the bodies stay in place and also that the cars keep their Polytyres are free from the floor. This way the stay nice and round!
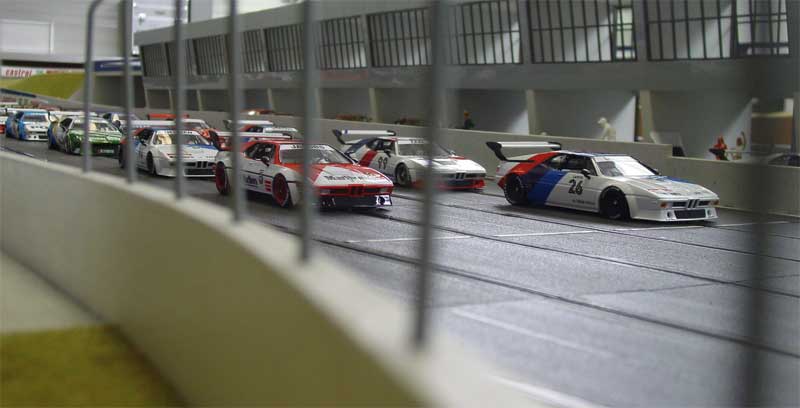
Procar BMW M1...a one make series with an individual touch
Hard work pays off: is this cool or what?!
 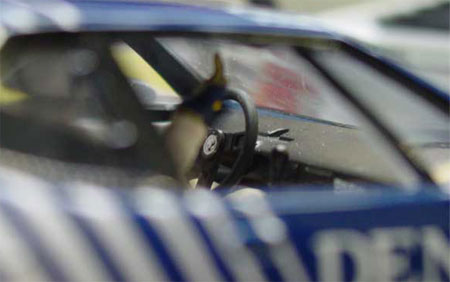
Here's another nice shot of the dashboard and pictured right is a more personal note from Willem.
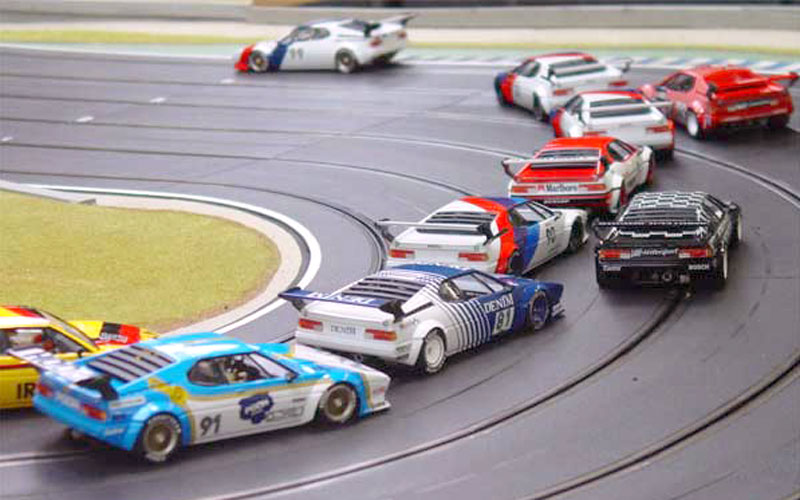
To bad we can't race them like this, but I garantee that the M1 racing class while be virtualy as tight and exciting, and boy will we have fun!!
Pictures of the Procar presentation can be found via this link
Pictures of all the cars build for the Procar seriesn can be found via this link
With regards, Nick
|
|


