| Topic Review |
tamar
|
posted on 6-6-2021 at 20:44 |
Good progress on the Aston(s) has been made in the last week, body now almost on target weight, now busy with placing all the digital bits and
pieces on the chassis.
I know I promised a step by step guide, but sorry could not resist posting this small side step.
So here are two pictures of the Scalex and Carrera interiors. Liked the back of the Scalex, hated the dash, loved the Carrera Helmet detail and driver
position...
..so what do you do? You cut them up off course and combine the best of both.
I started by cutting the dash and front part from the Scalex interior tray floor but kept the "walls" and the front mounting clip. I then cut and
mounted the front part of the Carrera interrior into the Scalex tub.
This way I preserved all the original Carrera mounting points for the Steering wheel, the seat, the safety net and the roll cage.
So that these detail parts can be easily positioned back in place on the (to be) vacformed interior
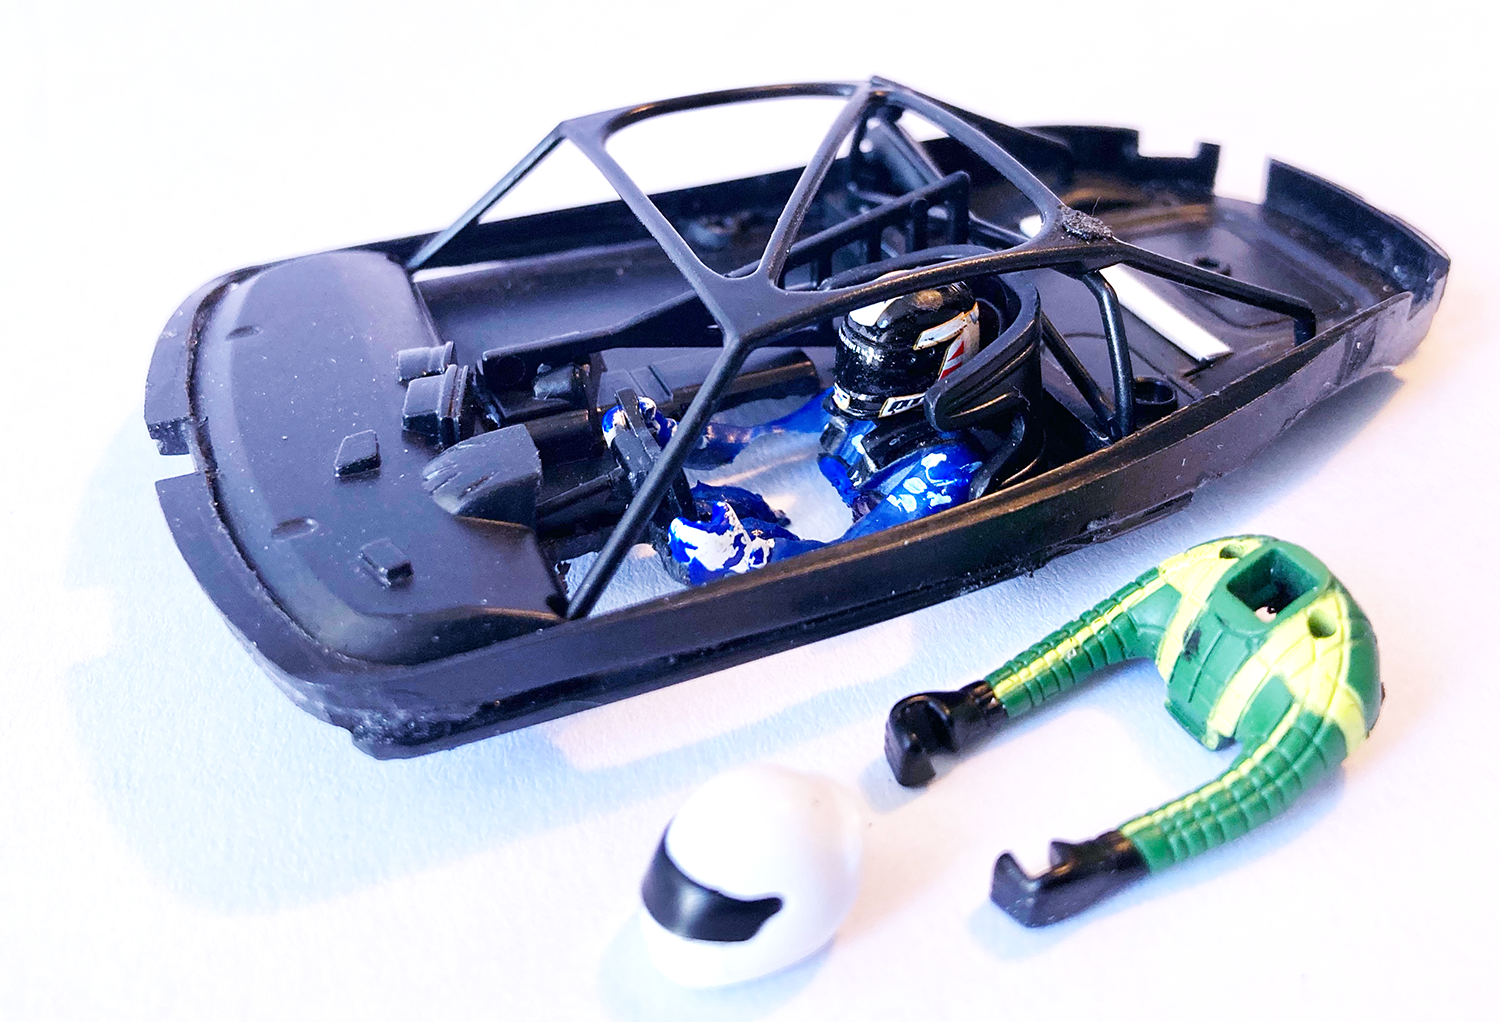
Although I love the Carrera helmet and driver position I didn't like the straight arms and no legs, so time for a bit of Dr Frankenstein.
I decapitated both the Stig and Fritz (the Carrera driver), did a thorough "lobotomy" on Fritz ( Driving brainless = saves 02,gr) and mounted Fritz
with HANS on the Stig's body...Time for a seat fitting.
Having Scalex casting the Stig in flexible rubber sure helped in getting his hands and arms in the right position with a good grip on the steering
wheel.
Milled away the Carrera Floor to make room for the arms and lower body. Kept a bit of the floor in between the steering wheel and the seat and bend it
down.
Shaping it with a Dremel to create Stig's knees.
Still need to add missing body parts to connect the knee bone to the waist bone for which I will use some milliput.
Will also use that to fix the missing bit on Stig's right arm as he no longer has an inline Short can to deal with.
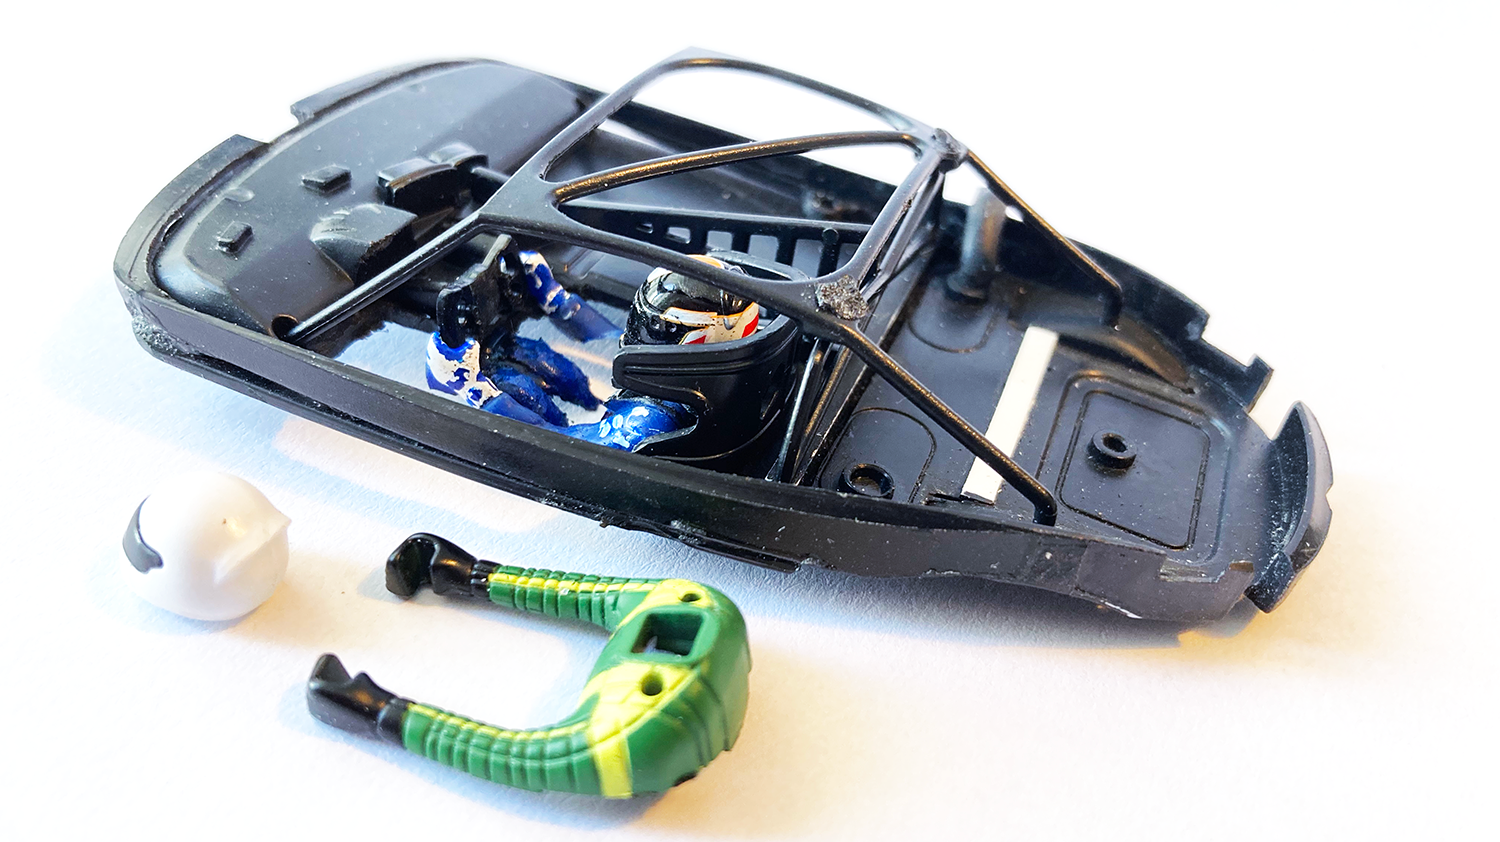
Started adding some detail to the rear of the Scalex interior tray, a missing suspension brace, a fuel filler hose, although after checking the
reference images...fuel tank is in the wrong position...
...so might have to relocate that. That's the downside of starting early with a car...there's too much time to get stuck on nice but futile
details.
Not all the detail changes were purely esthetic though, the wheel tubs I added.. not to make room for the wheels but for the spur gear.
With the original Scalex Vantage being an inline Slotcar the low slung interior tub would rub against the (much larger diameter) SW spur of the
ProSpeed Chassis.
Not in its neutral position, but with 1,5 mm of suspension travel, definitely an issue when on track.
Ok so yes I only needed to do that mod on the Gear side, but hey guys...symmetry? It was but a small job to do them both.
So last image of the "Seat fitting Session" the modified interior back in the body. Now the Vantage has an accurate Dash without the Scalex lumps,
but what is just as important...
...we're no longer driving around like a "Granny" with our nose too close to the dash...and the roll cage centre is now where it should
be...correctly positioned at the B pillars
To be continued
|
tamar
|
posted on 6-6-2021 at 20:37 |
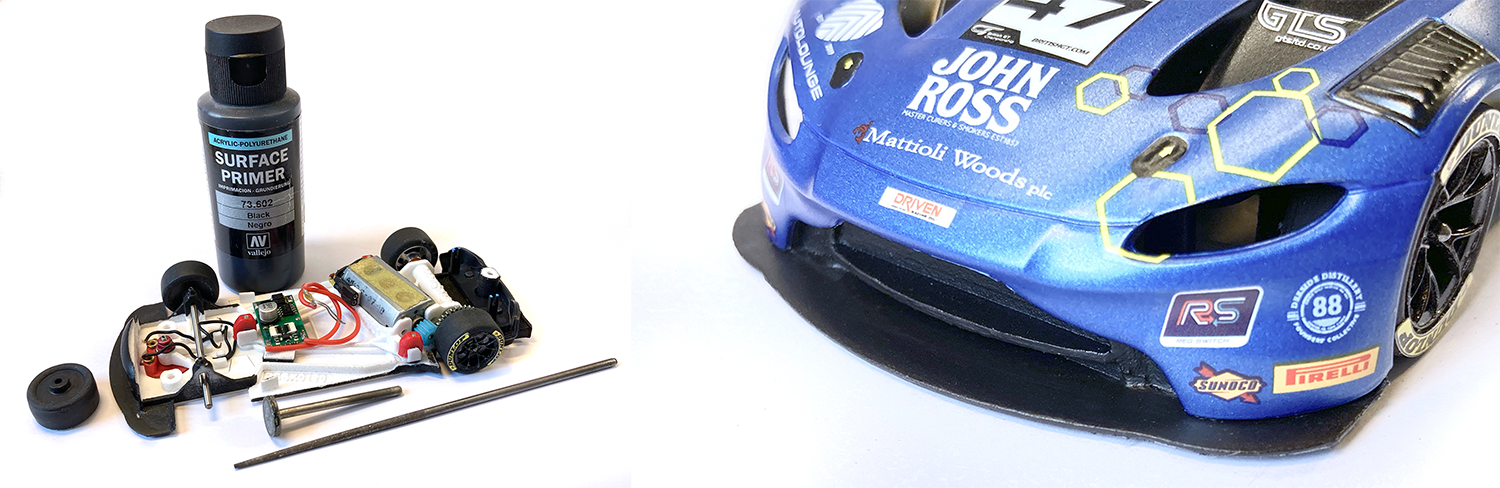
Before we get down to the chassis preparation, a few words on the material you'll be working with: a 3D printed chassis made from polyamide
powder (Nylon) that has been sintered (molten/fused) together layer by layer by a laser ( SLS = short for Selective Laser Sintering).
What does this mean, well, heat, small pellets being fused layer by layer (a SLS printed part can consist of hundred of layers) into a solid object,
although not entirely solid (ultra microscopic spaces remain between the pellets).
As the material heats up in the printing process it will expand and shrink when it cools down, so small deformations and or warping can occur.
Tolerances in 3DP SLS printing can range from ± 0.3 mm or ± 0.05 mm and can also be influenced by how the part was orientated in the print box.
Printed parts require (manual) post processing, most standard being the removal of excess (non sintered) pellets remaining in holes and crevasses on
the chassis.
This is done with a blast of compressed air and a blast medium.
While SLS produces a consistent surface finish the surface appearance is a satin-like matte finish that is slightly grainy to the touch.
Options to choose from.
Optional ( and advised if provided by the manufacturer) is post process "polishing" in which the part is put in a Media tumbler for a more polished,
shiny and smooth finish. Ok so far the marketing speech, but anyone that has doen a 3DP SLS body..knows just how polished, shiny and smooth that is
dry.png
But ok for a chassis its more than enough.
An other option is color, coloring of SLS printed material is done by dying the part, in other words "cooking the part is a colored solution"
Only the outer 0,1mm of the part is colored if you cut it open, you'll see the internals are stil "white".
Supervlieg (Steven V) chose to have his chassis dyed black, I prefer to have them polished but in natural color.
So what that this means for you?
Well, that when you start to work with a 3DP chassis, you'll need to check it just like any regular Plastic injection moulded chassis.
Check it for tolerances, for warping and additional for residue SLS material hidden in the nooks and crannies of your chassis.
If you discover a true "print error" or a broken party always contact your supplier. If the fault was caused during the printing and or post
processing Shapeways generally sends you a new part free of charge.
The properties of the "nylon" material make a 3DP SLS printed chassis extremely durable and flexible.
The downsides are they're also porous and very, very, very hard to sand.
So to prep your chassis you'll need all your regular tools..and then some.
Some of the tools I'm using for my chassis
- Rat tail file
- some good sharp knife's (X-acto, Scalpel #10 -#23)
- sharp side clippers
- A good set of diamond tools for your Dremel (that will cut the nylon instead of sand it and add friction that makes the nylon melt)
- A thread cutter (M2)
- Vallejo Acrylic primer to color, but also "seal" your chassis.
Preparing the chassis
So what do you do with all these tools? Well take a look at the pictures below, on the left what you will get when ordering the Prospeed Vantage GTE
chassis.
Stefan N (Prospeed cleverly combined all the bits & pieces for the chassis into one part.
This reduces the printing costs considerably as Printing companies like Shapeways calculate their prices by "print volume" meaning the space a part
uses in the print box and not so much by the amount of used Nylon print material.
The downside is, you'll need to separate the parts..for which it's best to use the sharp side clippers. On the right a picture of the cut chassis
and motor pod.
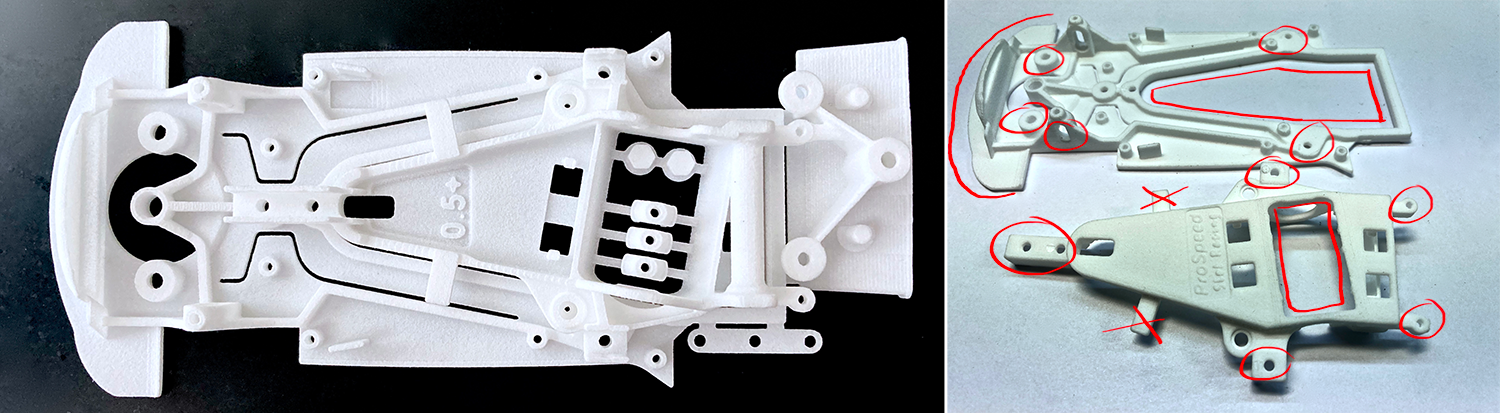
Clean up & polish
After you've separated the parts you need to clean up all left over remains of the connection studs and even when you've selected "polished" as an
option when ordering the chassis...
..polish all contact surfaces.... more. The smoother you get your contact surfaces, the smoother your chassis will run!
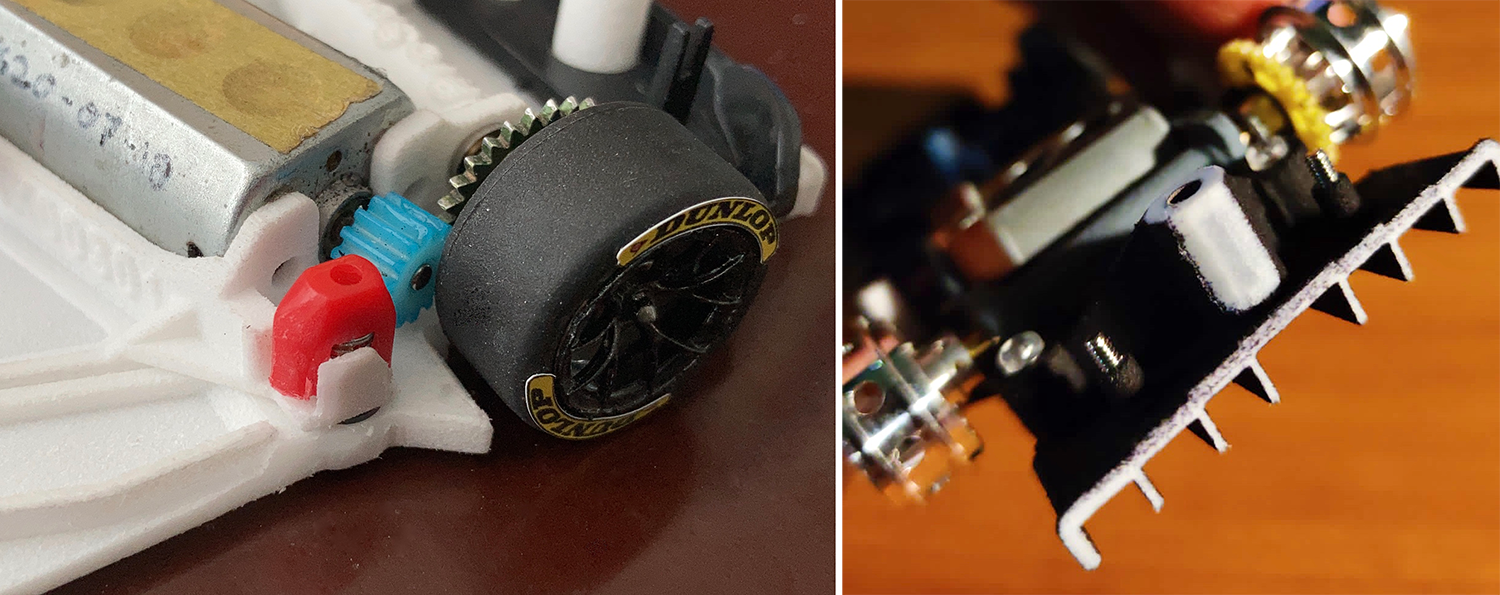
In the right image above I've indicated which areas I clean up and polish with a diamond tool (with various shapes & sizes)
All suspension and body mounts on both pod and chassis
Motor holder (only clean up)
Front Splitter
The whole outline of both chassis and pod (which includes the outside surface of your front axle mounts)
Now when I say polish..I mean polish, use a "light touch" with your Dremel, no need to apply more pressure than the weight of your Dremel.
or as mr Miyaki said to the Karate kid...wax in, wax out tongue.png so you won't change the overall shape of your contact surfaces.
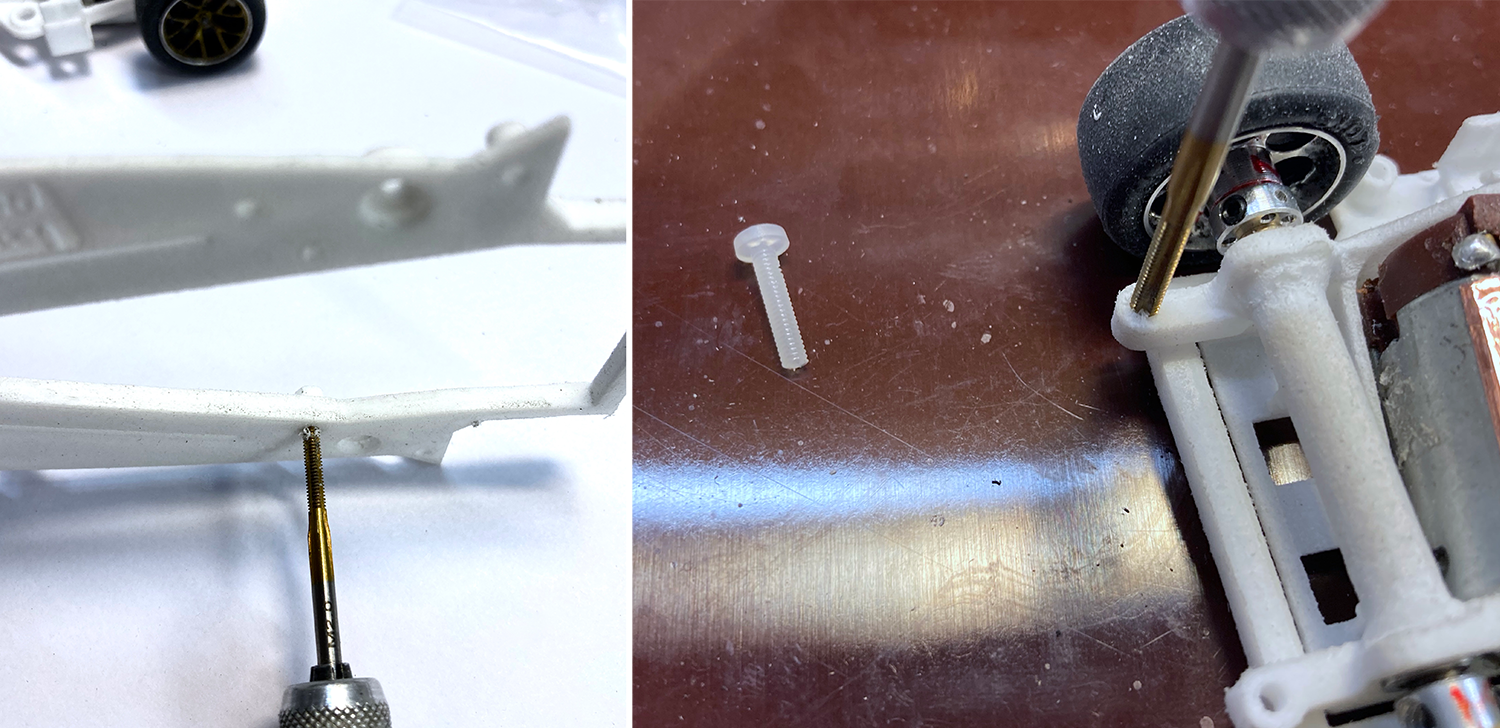
Screw mounts & holes
Next step is to address all the holes and mounts for Screws, guide and axles, again a light touch to clear any residual SLS material and giving them a
slight polish.
The holes in the mounts for the body support grub screws and rear diffuser (GTE Chassis) I prefer to cut the first 1/3rd of the hole with a thread
cutter.
You can mount the screws directly, but then the mount will expand a tiny bit when you insert the screw, and it will also be very tight.
As I use "torque adjustable screwdrivers I prefer my mounts threaded, easier, cleaner and no deformation.
If you plan on using metric screws for to mount your body (which I always do) the thread cutter will also be needed for the screw post in the body
(which will be covered at a later stage)
Chassis/ Body fit
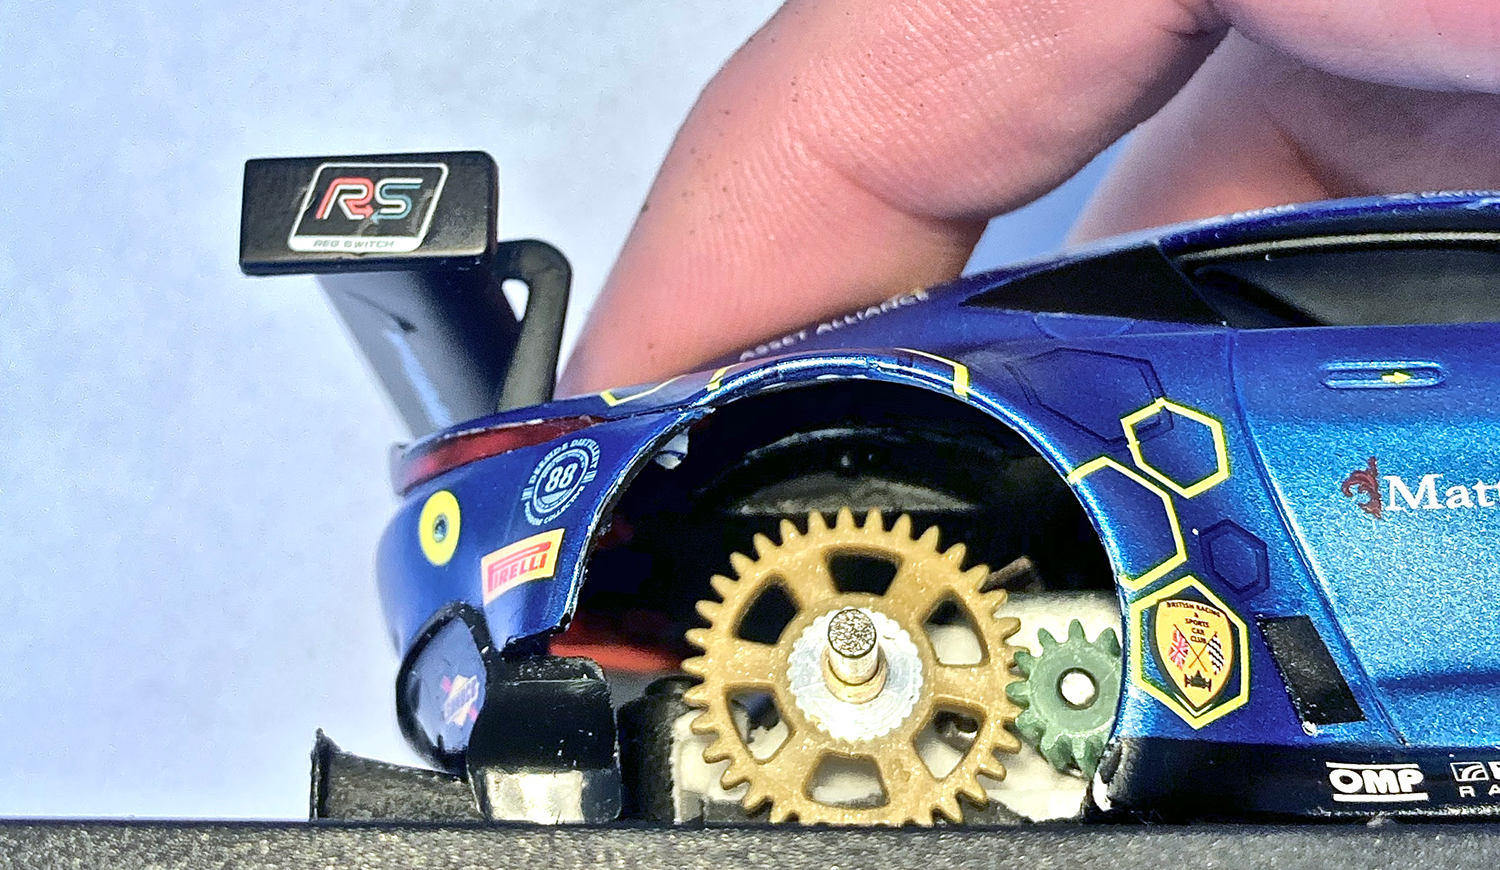
Next step is to check the body/ chassis fit, as Prospeed mentions is it product description, some material needs to be removed from the Scalex Aston
body for it to fit over the chassis.
Most noticeable are the reinforcement ribs in front of the rear wheel arches, these need to be cut back for both the GT3 and GTE chassis to make room
for the side suspension. And as we discovered some more material from the side skirts as well. See that small blue mark encircled on the body inside
pictured below right?
Well that's your tell tale sign to stop, as you're about to cut through your body.
chassis-body-fit.png
As I didn't want to remove more material from the lower parts of the body, I started to cut/champher material form the chassis sides and suspension
mounts of the motorpod. The rear body post needed trimming as well. It would fit inside the body, but there was no room for front to back body
float.
The good news for anyone wanting to build a Prospeed chassied Vantage in the future, is that they won't need to do this (or at least much less
extensive) as the feed back from Steven and me on assembling these prototypes will be incorporated in the final "retail" Chassis.
Ok that's all for tonight
to be continued
|
tamar
|
posted on 1-6-2021 at 02:25 |
Aston Martin Vangate GTE/GT3 by AMR

If you're small and lack the (budget) size and punch of the "big boys", but still want to play hard ball with them....you've got to be smart.
As a manufacturer of top of the line GT sportscars, the top tier category to display your product has to be a works team in the WEC FIA GTE class, yet
the majority of sales for customer race cars will be in GT3.
So when AMR started the design of the "new" Vantage based racer they did it in a way that would allow them to eat their cake and have it, one basic
chassis design easily converted from GTE to GT3 and back.
How easy, well in 2018 during the development of the GT3, AMR needed to attend a GTE test but all the factory cars were en route by ship to an
overseas event.
So they took one of the factory GT3 cars and converted it to GTE spec in less than 5 hrs, did the GTE test and converted it back to GT3 spec and
trucked it back in time for a VLN outing. (for the full story on Dailysportscar.com click
here)
Customer teams benefit from this smart design as well as AMR offers an "upgrade package" for their clients that allows them to run in both GT3 and
GTE spec with the same chassis.
A cost reduction that save teams some £200k GBP. [IMGalt="thumbsup.gif"]https://www.slotforum.com/forums//public/style_emoticons/default/thumbsup.gif[/IMG]
This option has allowed the ambitious British TF Sport to run client programs in various classes all over the globe. (British GT, VLN, European &
Asian Le Mans series, IMSA GTD and WEC GTE)
After 2 years of development to overcoming BoP inflicted challenges the Vantage has become a very potent package,
claiming not only the WEC world championship but also GTE Pro and Am class wins in the LM 24hrs and the British GT Championship on the trot.
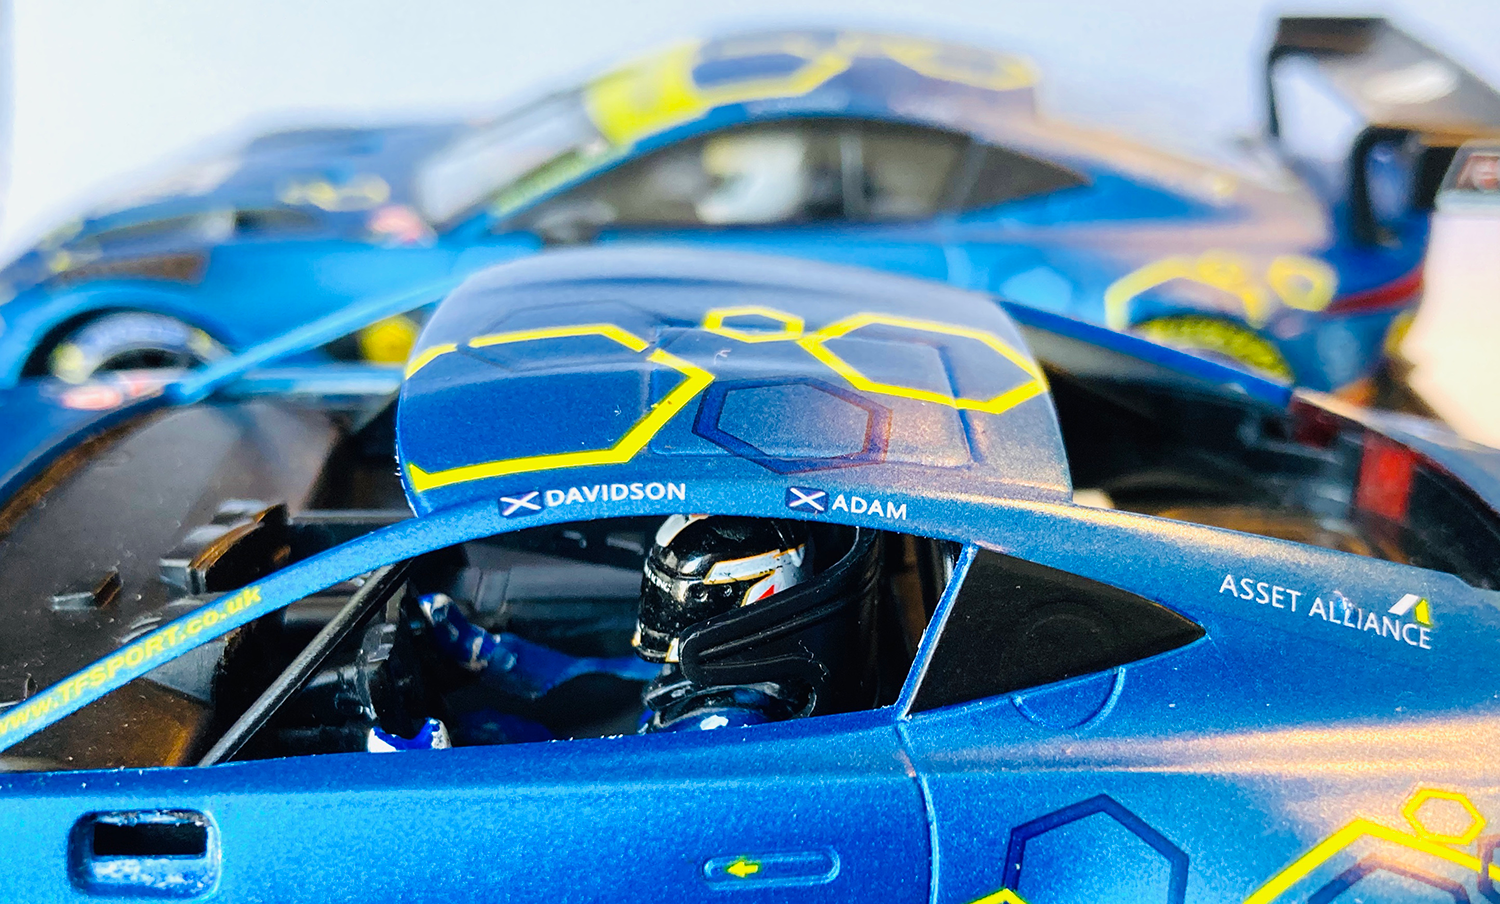
Aston Martin Vangate GTE/GT3 by Scalextric

So when Scalextric announced they would bring out the AMR Vantage I guess a lot of you hit that pre-order button. I didn't ...until I saw pictures of
the actual car.
A lot has been said about this car, stunning looks, spot on scale dimensions and, even though I don't have a home track or run stock cars, no doubt a
good runner straight out of the box.
Nice clean chassis design, no portruding detail parts that hinder body float. The AMR may run on its front wheels, but the guide is low and deep
enough to ensure good braid contact.
DPR hatch makes it digital ready, working lights etc. etc.
Some items most people don't tend to mention when talking about the body design is the interior and the way the cockpit, roll cage, windows, rear
wing and other details are mounted, also very nice and well thought out.
Love the way how Scalex shaped the delicate rear light cluster by integrating it with the whole of the bootlid, smart thinking on the rear valence and
how its mounted on the diffuser.
All fits like a glove and detail parts are easy to dis and re-assemble without breaking them, a handy feature for someone who wants to transform this
nice toy...and prep it for a bit a more serious playing field.
So @ Simon if you're reading this, please convey my compliments to the design team.
And Simon...while you're at it, could you also ask them to please take the same route for the announced "upgrade" of the AMG GT3 to 2018 spec?
Specially the "spot on scale dimensions" part? [IMGalt="innocent.gif"]https://www.slotforum.com/forums//public/style_emoticons/default/innocent.gif[/IMG]
Aston Martin Vangate GT3 by...me

As mentioned earlier Steven V (Supervlieg) and I will each build a car based on the Scalex AMR with a ProSpeed Chassis.
Stefan Nalbach already had 3DP chassis in his range for the AMR Vantage with stock Slot.it and NSR pods, which even incorporated mounting the Scalex
designed rear valance to be mounted on the 3DP diffuser.
So "all" he had to do was flip the chassis for, what he calls the SRN pod, so our DiSCA spec GT3 chassis has the pinion on the left, allowing the
"timed" Scaleauto Baby Sprinter motor to run in the "right" direction.
The GTE/GTLM spec chassis required a bit more work, but basically was a task of transplanting the pod and diffuser design we did for the BMW M8 GTE into the AMR chassis
design.
Now those "spot on scale dimensions" of the Scalex Vantage body ensure there's plenty of room for your rubber to be mounted under the 64mm wide
wheel arches, but also makes the body taper down to 55mm at the doors.
Which means some material needs to be removed from the body to make room for the 52mm wide NSR AW pod based suspensions mounts on the GT3 chassis.
With the narrower 49mm wide SW pod for the GT LM/ GTE chassis this is much less off an issue.
As Steven was a bit anxious to cut through his nice AMR body to make room for the GT3 chassis and I had already build a GT LM/GTE chassis..I will be
doing the GT3.
But...as I have (an acknowledged) wheel fetish, I can't start a project in a proper way, without some good matching wheels.
Normally when doing a Scalex conversion I just pull the wheels of the stock chassis as they are nicely detailed, but remember what I wrote on "detail
parts are easy to dis and re-assemble without breaking them"?
Well for some reason this didn't apply to the wheels. Normally a delicate but forceful pull and twist is al it takes to pry the wheels of Scalex
serrated axles...but on the AMR the required force meant no more delicacy.
I stopped pulling before totally deforming the axle mounts and headed for my parts bin.
The wheels from my abandoned Sideways
BMW M6 project were a perfect match for the Scalex AMR Vantage,

If cloths maketh the man, wheels maketh the car, 20,2mmø at the front and 20,8mmø at the rear, a bit undersized for the huge wheel arches of the
Sideways BMW M6.. but a great match for the Scalex AMR Vantage.
BODY PREP, A RARE ACT OF CAUTION
Must be because there's no deadline to finish the car for a race "next week" but normally I don't have the time...or patience to do this.
But in order to protect that lovely matt blue metallic finish of the #47 TF Sport from scratches, chemicals, glue or oil, my acidic fingers might
transfer onto the body...
...the second step was to dis-assemble all the detail parts and give the bare body some protective coats of clear.
A gentle wash with a mild detergent, a quick blast with clean air to blow off any dust particles and a first thin coat of Mr Hobby's Acrylic Clear
coat.
This is my go to clear when I'm not sure how factory paint, decals or tampo prints will react to a stronger 2K or cellulose based clear.
I managed to restrain myself for 4 hours before applying the second misted layer ...and a full day... [IMGalt="lmfao.gif"]https://www.slotforum.com/forums//public/style_emoticons/default/lmfao.gif[/IMG]
...before applying a 3rd coat with the cellulose based and as such petrol and oil resistant semi gloss Mr Super Clear.
As the semigloss dried to a shinier finish than the original Scalex finish, I will most likely add a 4th coat of Mr Super Clear matt when the car is
finished.

That's it for now...
to be continued
|
|
